Wednesday, July 28, 2010

finally my latest and newest E-Wallpaper


>>>>>finally, done it...hope it will be better than the older
>>>>>idea of this ewalpaper-money bills are flying out from book and the book shows studying(FOM), and your future...
>>>>>while doing this, i was using many Tools and Effects in Photoshop. Really learn a lot after doing this compare to doing the older ewallpapaer(sunrise) and refer to a lot of websites as my guide and also Madam Lydia's uploaded materials and i also put a lot of efforts and time...^^
>>>>TO:MADAM LYDIA, i will submit my files to you when in tutorial class because i couldn't upload to mmls.THANKS TO YOU for helping me and comments for me.Appreciate it a lot...^^hope my ewallpaper can get high marks or may be can get full marks because i had fully utilize all tools and effects in photoshop. THANKS MADAM LYDIA!!!
>>>>thanks to my housemate and my mum for giving me comments also^^

text~~and Square~~


>>>>>using Rectangle tool to draw a square below and type in inquiries
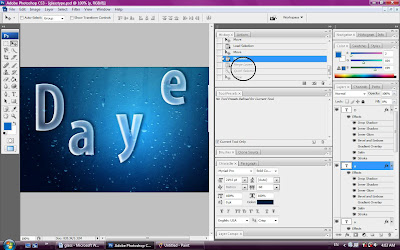
>>>>>use Text tool to type those words and edit it at Blending Option

glass type(open day)~


>>>>create a layer and Fill in color, adjust in Blending option to make it like glow light in center
>>>>open another image and set the Blend mode
>>>>type in those words "open day" and adjust it in Blending Option
>>>>to make it Transparent word, adjust the Fill to zero..as shown
>>>>put a word to the center to get the effect then merge with the two background
>>>>use Quick selection and Move tool then move to the file
>>>>back to History, delete those merge layer as shown
>>>>do it to another words, repeat it again and again...

FOM~


>>>>Open a Photo
>>>>duplicate the background layer
>>>>add a new blank layer between the two layers
>>>>Hold down "Ctrl"and click on the New Layer icon in the Layers palette.
>>>>fill the layer with white as shown
>>>type in text and color as white as shown
>>>create Clipping Mask, Layer>clipping mask
>>>then move to my file again and edit size CTRL+T and Blending option

fireworksss~


>>>>>use Pen Tool then select Paths then create curve as shown
>>>>>Select the Brush Tool. Select a Foreground Color of White. Set the Size of the brush to 3px (Hardness 100%).Under Shape Dynamics brush, set up a fade of around 200px.
>>>>back to the Pen Tool. Right Click anywhere on the Canvas, and select Stroke Path
>>>>Repeat this step several times
>>>>adding some blending options to burst layer,Drop Shadow, and Outer Glow.
>>>>Create a new Layer
>>>>>Select the Brush Tool, select a default round brush (to override earlier modifications to the brush tool), and then set the hardness to 0% and the size to somewhere around 200px. Set the Foreground Color to white. Click once to near the center of the streaks.
Set this layers Blending Mode to Overlay.
>>>>>repeat it but change the brush size
>>>>>adding spark by using Brush tool also but adjust again in Brush Preset, then brush in some sparks for firework.

mmu logo~


>>>>>use again Quick selection and Text Tool to do the logo and text

money flying bills


>>>>>use Quick Selection tool then Move tool to move out
>>>>>adjust again at layer style

book~


>>>>use Crop tool to crop the image..
>>>>use Clone Stamp to erase out the center page,and also the bottom of book
>>>>use Magic Wand tool to select the book completely
>>>>use Move tool to move to the file and CTRL+T(free transform) to adjust the size
>>>>adjust the Layer style as shown

smoke~


>>>>>using Pen tool to draw a shape
>>>>>then go Filter>blur>motion Blur, smoke appear...

fom building~


>>>>adjust the photo by using Curve...
>>>>erase using Eraser tool and selected part using Polygonal Lasso tool then Inverse select it..as shown
>>>>>go Filter>blur>gausian blur to adjust blur effect then move to the file
>>>>>on the Layer style, adjust Stroke and Drop shadow
>>>>>after that, i Layer Mask it to adjust again

continue~


>>>>Create a new layer on top of the others and go to Filter>Render>Clouds
set it as black and white for the background and foreground colors, then change the Blend Mode to Color Dodge and adjust the opacity

step 2


>>>>>i m doing this in another file and i m using different color of background
and light effect by adjust the BLENDING OPTION
>>>after that, i move to the file again and adjust the place to make the light appears at the bottom.

steps of doing this e-wallpaper


>>>>>paint the background with dark blue color using Paint Bucket Tool...
>>>>>using SPONGE TOOL to paint the background as shown and adjust the brushes

images would be used in the new ewallpaper